Pages

Tuesday, February 19, 2013

Decorative Family Plate


Hello everyone – I hope you are having a good week. Today I want to share a simple project with you as I have a rather large project going on at the moment.

For this project I used a $0.99 plate I found at Goodwill that matches the color of my kitchen perfectly, brown vinyl, transfer tape, and my Silhouette.

First start by cleaning the plate and ensuring it is completely dry.

Second is the fun part of selecting the designs you want to use to decorate your plate. For this plate I used the Silhouette Scroll Tree ID#6981 and one of the scrolls from ID#13648 Flourish both are by Hero Arts. This scroll might look familiar as it is the same one I used for my Monogram Coasters. The font for the letters is Lucida Calligraphy and I selected a font size that would fit along the edge of the plate.

Once all the designs have been sized to fit and cut I used the transfer tape to position the designs and used my scrapper to ensure all of the bubbles were removed. Remove the transfer tape and voila!

I have one other decorative plate I will share with you next time.
 
Tracey

Thursday, February 14, 2013

Happy Valentine's Day


Happy Valentine’s Day everyone! I hope your day and evening are filled with LOVE!

Tracey


Tuesday, February 12, 2013

Monogram Magnets


In my last post I shared with you the Monogram Coasters I gave as gifts for Christmas so today I will share with you the second part of the gift everyone received – Monogrammed Magnets. I found the inspiration for this gift on Pinterest created by Little Miss Momma, but wanted to personalize my magnets which also added a few extra steps. 


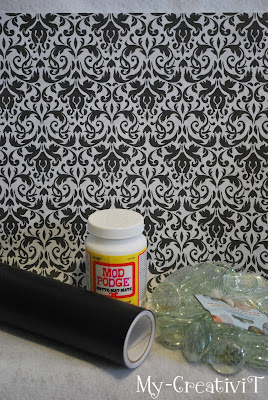
For this project you will need:
Scrapbook paper
Mod Podge – I used Matte Finish
Vinyl
Magnet strip (not pictured)
Beacons 3-in-1 glue (not pictured)
Clear glass beads – from Hobby Lobby


I started by cutting several circles that are a little larger than an inch. Next apply Mod Podge to the bottom of the glass bead and center the paper on the bead making sure to remove any bubbles.     
 
Using my Silhouette I cut vinyl letters that are approximately one inch (or 87.9pt) using the Harrington font.
 
To finish attach a piece of the magnet strip to the back of the glass bead. While the magnet strip will have an adhesive back I recommend using Beacons 3-in-1 glue to ensure the magnet is secure.
 There you have it - a quick and inexpensive personalized gift idea.
 
Tracey

Thursday, February 7, 2013

Monogram Coasters


One of the crafty gifts I gave this year for Christmas was monogrammed coasters. They were fairly inexpensive to make as I purchased a box of 100 white tiles from Home Depot and depending on how many you are making this can be a quick project. Due to the number of sets I was giving as gifts and each set containing four coasters it took me a little longer to finish them.

First I selected the font I wanted to use – which is Goudy Old Style and the font size is 266. I cut several different flourish designs to determine the one I wanted to use and decided to go with Design 13648 Flourish by Hero Arts. Then I put my poor Silhouette to work cutting all of the vinyl pieces for the coasters.

While my Silhouette was fast at work I cut the pads and adhered the felt pads to the bottom of each coaster. I found using adhesive backed black felt was the quickest and cheapest product to use.

Once some of the vinyl was cut I started prepping my designs and adding transfer paper. Then it was time to start adding the designs to the each coaster and finish them off with glossy Mod Podge. This is what my desk looked like while some of the coasters were drying.     
 
 
After I finished all the coasters I tied each set with black ribbon.
With my daughter being an Alabama fan I decided to make a different coaster for her since I found this really cute houndstooth paper. I cut the paper a little smaller than the coaster and used red vinyl for her monogram – she loved them me on the other hand would have preferred them to be a different color. J  
Tracey

Monday, February 4, 2013

Gourd Snowman Family


Well we finally received our first “significant” snow here in middle Tennessee. Now those of you who live in snow prone areas do not laugh that I’m calling this small amount of snow “significant”. J  Since we’ve had a little snow on the ground I thought it would be a great time to share with you my gourd snowman family. But first here are a couple of pictures of the pretty snow.


I previously purchased gourds at our county fair to make my bird feeder and birdhouse so this year when I was perusing the gourd booth these little guys caught my attention. I thought they would make a perfect snowman family – this is how they looked before.  


I used three coats of Martha Stewart Wedding Cake to make sure they were well covered. Once they were completely dry I used some black paint to add their eyes, mouth, and buttons then added my carrot nose using orange paint. I found some really cute snowflake ribbon at Wal-Mart to use for the scarf and that is it. This was a simple project and now I have our snowman family to add to my winter collection.

 
Tracey